Sending follow up messages or "drip campaigns" is a powerful email marketing tactic. You can create a follow up messages to welcome subscribers to your newsletter, to advertise for a special event, to send reminders, and more.
Note: If you are looking for more flexibility than the "Follow up" tool offers (like using a dynamic list to trigger the messages, or sending subscribers down different paths based on their preferences), you should use the Advanced Automation tool instead.
Create a Follow Up List
- Follow the directions in the Create a List Wiki article to create a new list specifically for the follow up messages. The list name must contain the word "follow-up". E.g. "Web site signup follow-up."
- This ensures that you don't inadvertently trigger a follow-up plan to an established list, or import subscribers without knowing the list is potentially tied to a follow-up plan.
- Please note: any existing subscribers or new subscribers added to a follow-up plan/list, by any method, can potentially and immediately receive an email according to the plan schedule.
Create a Follow Up Message
- Open the Messages folder and click Follow Up
- Click the Convert message to follow-up message button
- Select a message
- Click the Select Message button
- Edit the Subject and From address
- Click Send Test Email if you would like to receive a copy of the email before setting up the follow-up message
- Click Next
- If the information is correct, check the box I agree that the above information is correct
- Click the Create Follow-up Email button
Create a Follow Up Plan Schedule
- Open the Messages folder and click Follow Up
- Click the Add follow-up plan button
- Enter a Follow-up Description
- Select the list you would like to receive the follow-up messages
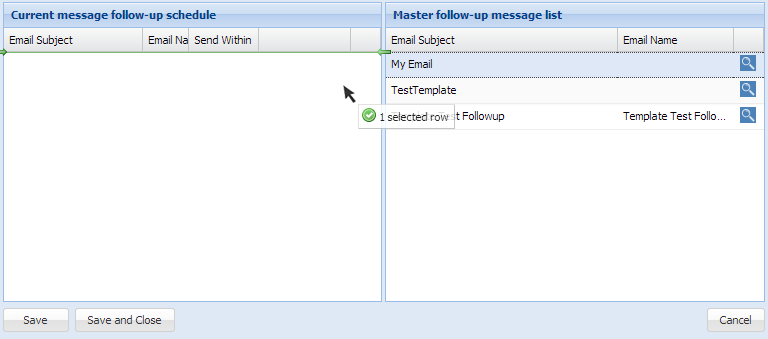
- Select messages from the master list that you would like to send as a follow-up message
- Click the magnifying glass icon to preview the message
- Click, drag, and drop the follow-up messages from the master list to the current message list to add messages to the follow-up plan
- If you want to create another follow-up message to add to the master list, click the Add New Follow-Up Message button
- Click on the message in the Current message follow-up schedule panel and change the number of days to wait before sending this message. To send a message out immediately, select "0 days after previous send."
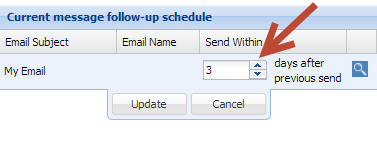
- Click Update to save changes to the days after previous send
- Click Save to save the Follow-up message plan
- Once the follow-up plan is exactly how you want it, change the status from Paused to Active
- Click Save to save the Follow-up message plan
Edit the Follow Up Plan
- Open the Messages folder and click Follow Up
- Double click the follow-up plan or select and click Edit follow-up plan
- Change the options by following the steps listed previously
Pause the Follow Up Plan
- Open the Messages folder and click Follow Up
- Select the follow-up plan you would like to Pause
- Click Pause follow-up plan
Comments
0 comments
Please sign in to leave a comment.